CAN2USB : $100
BareCAN : $80
CAN232 : $100 
I2C232 : $90
U.S. Shipping Addresses Only.
Sorry we do not ship Internationally.
View Online Shopping Cart
Introduction
In this project we're connecting the Seeed Development XIAO ESP32C3 module to a 2.4 inch LCD and using a capacitive touchsensor as an input device.

Here's the YouTube video on this project.
This is what the completed project looks like.


Basic Breadboard Connections
The basic breadboard wiring is shown here.
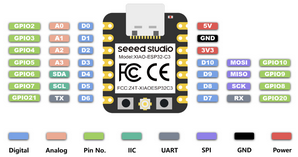
RED is Vcc LCD Pin 1 to ESP32 3V3
BLACK is ground - LCD Pin 2 to ESP32 GND
PURPLE is MOSI - LCD Pin 3 to ESP32 MOSI
YELLOW is SCK - LCD Pin 4 to ESP32 SCK
GREEN is LCD CS - LCD Pin 5 to ESP32 D0
ORANGE is LCD DC - LCD Pin 6 to ESP32 D1
BLUE is LCD RST - LCD Pin 7 to ESP32 D2
This shows the addition of the XIAO ESP32C3 and the 2.4 inch LCD.

Basic Breadboard Wiring

Adding the touch sensor
The touch sensor signal line is connected to the D6 pin on
the ESP32C3 micro and power and ground are connected as well.

The Software
Start with a new Arduino Sketch.

Under Examples scroll down under Adafruit ILI9341 and select "graphicstest".

Scroll down past the #include file section and change the TFT_CS and TFT_DC pins as highlighted in yellow. Add the TFT_RST pin as highlighted in gree.
#include "SPI.h"
#include "Adafruit_GFX.h"
#include "Adafruit_ILI9341.h"
// For the Adafruit shield, these are the default.
#define TFT_DC D1
#define TFT_CS D0
#define TFT_RST D2
In the setup() function add the statement highlighted in green that sets the TFT_RST pin as an output and then sets it low and then high to reset the display.
void setup() {
pinMode( TFT_RST, OUTPUT );
digitalWrite( TFT_RST, LOW );
delay(50);
digitalWrite( TFT_RST, HIGH );
At the end of the setup() function add the functions shows the set the display to green.
tft.fillScreen(ILI9341_GREEN);
yield();
In the loop() function add the following function.
showClassNotes();
Two more functions are needed. The first is rect() function add this before the loop() function. This displays show patterns between menu picks.
void rects( void )
{
Serial.print(F("Rounded rects (outline) "));
Serial.println(testRoundRects());
delay(500);
Serial.print(F("Rounded rects (filled) "));
Serial.println(testFilledRoundRects());
delay(500);
}
void showClassNotes( void )
{
tft.setRotation(3);
pinMode( D6, INPUT );
byte menu = 0;
for( ;; )
{
char s[20];
sprintf( s, " In this video\n we'll explore\n the .... " );
tft.setTextColor(ILI9341_BLACK); tft.setTextSize(2);
tft.setCursor(50, 50);
// tft.println(s);
delay( 1000 );
bool touch = false;
for( ;; )
{
if( digitalRead( D6 ) )
{
touch = true;
}
else
{
if( touch == true )
{
menu++;
rects();
tft.fillScreen(ILI9341_GREEN);
}
touch = false;
}
switch( menu )
{
default: menu = 0;
case 0: tft.setCursor(0, 10);
tft.println(" In this Arduino 3D");
tft.println(" Thursday Video we'll");
tft.println(" connect a 2.4 inch LCD" );
tft.println(" to a Seeed Development");
tft.println(" XIAO ESP32C3 module");
tft.println(" and use a capacitive ");
tft.println(" touch sensor as an input. " );
break;
case 1: tft.setCursor(50, 50);
tft.println("menu 2");
break;
}
delay( 10 );
}
}
}
Here's the completed sketch for this project--> graphicstest.ino